MyBatis
搭建MyBatis
1. 引入依赖
    <dependency>
      <groupId>org.mybatis</groupId>
      <artifactId>mybatis</artifactId>
      <version>3.5.7</version>
</dependency>2. 创建核心配置文件
配置MyBatis的全局配置信息,习惯上命名为mybatis-config.xml,核心配置文件放在src/main/resources目录下,用于配置数据库环境、事务管理、数据源、别名、插件等全局性的信息。
一个常见的 mybatis-config.xml 示例配置如下:
<?xml version="1.0" encoding="UTF-8" ?>
<!DOCTYPE configuration
PUBLIC "-//mybatis.org//DTD Config 3.0//EN"
"http://mybatis.org/dtd/mybatis-3-config.dtd">
<configuration>
<!-- 全局属性 -->
<settings>
<!-- 打印SQL到控制台 -->
<setting name="logImpl" value="STDOUT_LOGGING"/>
<!-- 开启驼峰命名自动映射 user_id -> userId -->
<setting name="mapUnderscoreToCamelCase" value="true"/>
</settings>
<!-- 别名配置 -->
<typeAliases>
<!-- 单个别名 -->
<typeAlias alias="User" type="com.example.model.User"/>
<!-- 批量扫描包下的类,类名自动作为别名 -->
<package name="com.example.model"/>
</typeAliases>
<!-- 插件配置(分页、性能分析等常用) -->
<plugins>
<!-- 示例:MyBatis-Plus分页插件 -->
<!--
<plugin interceptor="com.baomidou.mybatisplus.extension.plugins.MybatisPlusInterceptor">
<property name="..." value="..."/>
</plugin>
-->
</plugins>
<!-- 环境配置(可配置多个环境,如开发、测试、生产) -->
<environments default="development">
<environment id="development">
<!-- 事务管理器 -->
<transactionManager type="JDBC"/>
<!-- 数据源配置 -->
<dataSource type="POOLED">
<property name="driver" value="com.mysql.cj.jdbc.Driver"/>
<property name="url" value="jdbc:mysql://localhost:3306/mydb?useSSL=false&serverTimezone=UTC"/>
<property name="username" value="root"/>
<property name="password" value="123456"/>
</dataSource>
</environment>
</environments>
<!-- Mapper配置 -->
<mappers>
<!-- 单个配置 -->
<mapper resource="mapper/UserMapper.xml"/>
<!-- 或者扫描包 -->
<package name="com.example.mapper"/>
</mappers>
</configuration>NOTE
在使用 Spring Boot 整合 MyBatis 后,通常就不需要手写 mybatis-config.xml 了,大部分配置可以直接放在 application.yml(或者 application.properties)里,Spring Boot 会自动加载。
下面是常见的 Spring Boot + MyBatis 的配置application.yml
spring:
  datasource:
    driver-class-name: com.mysql.cj.jdbc.Driver
    url: jdbc:mysql://localhost:3306/mydb?useSSL=false&serverTimezone=UTC
    username: root
    password: 123456

mybatis:
  # 配置 mapper.xml 文件路径
  mapper-locations: classpath:mapper/*.xml
  # 配置实体类所在包,自动起别名(类名首字母小写)
  type-aliases-package: com.example.model
  configuration:
    # 开启驼峰命名 user_id -> userId
    map-underscore-to-camel-case: true
    # 打印 SQL
log-impl: org.apache.ibatis.logging.stdout.StdOutImpl3. 创建mapper接口
MyBatis中的mapper接口相当于以前的dao。但是区别在于,mapper仅仅是接口,我们不需要提供实现类
 public interface UserMapper {
   /**
   * 添加用户信息
   */
   int insertUser();
}4. 创建MyBatis的映射文件
MyBatis映射文件用于编写SQL,访问以及操作表中的数据。一个映射文件对应一个实体类,对应一张表的操作。
映射文件存放的位置是src/main/resources/mappers目录下
- 映射文件的命名规则:
类名+Mapper.xml,其中类名是表所对应的实体类。
例如:表t_user,映射的实体类为User,所对应的映射文件为UserMapper.xml - MyBatis中可以面向接口操作数据,要保证两个一致:
- mapper接口的
全类名和映射文件的命名空间(namespace)保持一致 - mapper接口中方法的
方法名和映射文件中编写SQL的标签的id属性保持一致
- mapper接口的
<?xml version="1.0" encoding="UTF-8" ?>
  <!DOCTYPE mapper
  PUBLIC "-//mybatis.org//DTD Mapper 3.0//EN"
  "http://mybatis.org/dtd/mybatis-3-mapper.dtd">
  <mapper namespace="com.atguigu.mybatis.mapper.UserMapper">
    <!--int insertUser();-->
    <insert id="insertUser">
      insert into t_user values(null,'张三','123',23,'女')
    </insert>
  </mapper>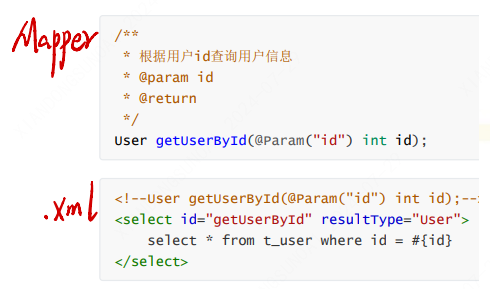
4.测试
@SpringBootTest
public class UserService {
    @Autowired
    private UserMapper userMapper;

    @Test
    public void test() {
        List<User> result = userMapper.getUserList();
        System.out.println(result);
    }
}5. 加入log4j日志功能(SpringBoot内置)
Mybatis内置的⽇志⼯⼚提供⽇志功能,具体的⽇志实现有以下⼏种⼯具:
- SLF4J
- Apache Commons Logging
- Log4j 2
- Log4j(3.5.9 起废弃)
- JDK logging
具体选择哪个⽇志实现⼯具由MyBatis的内置⽇志⼯⼚确定。它会使⽤最先找到的(按上⽂列举的顺序查找)。 如果⼀个都未找到,⽇志功能就会被禁⽤。
<!--log4j2⽇志-->
<dependency>
  <groupId>org.apache.logging.log4j</groupId>
  <artifactId>log4j-core</artifactId>
  <version>2.17.2</version>
</dependency>NOTE
⽇志的级别
FATAL(致命)>ERROR(错误)>WARN(警告)>INFO(信息)>DEBUG(调试)
从左到右打印的内容越来越详细
Mapper.xml的语法
一、前言
- MyBatis是"半自动"的ORM框架,即SQL语句需要开发者自定义,MyBatis的关注点在POJO与SQL之间的映射关系。
- SQL语句配置在Mapper.xml中,该配置文件可以自定义文件名。 文件的样式如下:
<!DOCTYPE mapper PUBLIC "-//mybatis.org//DTD Mapper 3.0//EN" "http://mybatis.org/dtd/mybatis-3-mapper.dtd" >
<mapper namespace="com.scau.demo.mapper.UserMapper">
## ...具体内容...
</mapper>其中,namespace用于绑定Mapper接口。不同mapper接口对应到不同的xml。
二、mapper.xml
- mapper:指定唯一的
namespace,一般设置成mapper类的全路径名。 - select:对应SQL中的
select插入语句。- id:为该语句的属性,通常与
mapper.java文件的方法名相同。 - parameterType:查询语句参数类型。
- resultType:查询结果的类型
- id:为该语句的属性,通常与
  // UserMapper.java
  //查询全部⽤户
  List<User> getUserList();
  //根据id查询⽤户
User getUserById(String id);<!-- UserMapper.xml -->
<select id="getUserList" resultType="com.hello.bo.User">
select id, name, pwd, age from user
</select>
<select id="getUserById" parameterType="java.lang.String" resultType="com.hello.bo.User">
select id, name, pwd, age from user where id = #{id}
</select>NOTE
- 查询的标签
select必须设置属性resultType或resultMap,用于设置实体类和数据库表的映射关系
resultType:自动映射,用于属性名和表中字段名一致的情况resultMap:自定义映射,用于一对多或多对一或字段名和属性名不一致的情况
- 当
查询的数据为多条时,只能使用集合,不能使用实体类作为返回值,否则会抛出异常TooManyResultsException;
但是若查询的数据只有一条,可以使用实体类或集合作为返回值
三、parameterType
如果传递的是简单的参数,是简单的数据类型,参数类型可以省略,原生的类型或简单数据类型(比如整型和字符串)因为没有相关属性,它会完全用参数值来替代。
- 省略参数
<select id="selectUsers" resultType="User">
  select * from user  where id = #{id}
</select>- 传递对象 参数类型是个User对象,User 类型的参数对象传递到了语句中,id、username 和 password 属性将会被查找,然后将它们的值传入预处理语句的参数中。
<insert id="insertUser" parameterType="User">
  insert into users (id, username, password) values (#{id}, #{username}, #{password})
</insert>- 指定参数类型
- 参数也可以指定一个特殊的数据类型。
#{property,javaType=int,jdbcType=NUMERIC} - 对于数值类型,还有一个小数保留位数的设置,来确定小数点后保留的位数。
#{height,javaType=double,jdbcType=NUMERIC,numericScale=2}
四、获取参数值
MyBatis获取参数值的两种方式:${}和#{}
NOTE
${} 和 #{}的区别:${}的本质就是字符串拼接,#{}的本质就是占位符赋值
#可以实现预编译,会先把#{变量}编译成?,在执行时再取值,可以防止sql注入。$是直接进行字符串替换。
#符号的应用场景
需要在sql映射文件中动态拼接sql时的开发场景,比如传入多个变量进行条件查询、传入一个POJO进行数据插入等。
$符号的应用场景
用于传入的参数是sql片段的场景下,会直接进行字符串替换,完成了sql的拼接。
#可以实现预编译,主要表现在数据类型检查和安全检查两部分:
数据类型检查表现在:若检测到为数值类型,就不加引号,即?;若检测到位字符串类型,就加上引号,即'?'。
安全检查表现在:若变量的值带有引号,会对引号进行转义处理,这样可以防止sql注入。
比如name是jack,如果select * from user where name =#{name}翻译成name ='jack', 如果是name =${name}翻译成name = jack
若mapper接口中的方法参数为实体类对象时, 此时可以使用
${}和#{},通过访问实体类对象中的属性名获取属性值,注意${}需要手动加单引号
@Param注解标识
可以通过@Param注解标识mapper接口中的方法参数。此时,会将这些参数放在map集合中,以@Param注解的value属性值为键,以参数为值。
此时,只需要通过${}和#{}访问map集合的键就可以获取相对应的值,注意${}需要手动加单引号,因为它是拼接。
例如:
Mapper接口: int insert(@Param("username") String name, @Param("userage") int age)
xml: insert into usertable (username, userage) values (#{username,jdbcType=VARCHAR}, #{userage})
五、XML转义字符
少部分特殊字符写入到 XML 文件会被 XML 语法检测报错,XML为这些字符提供了转义
| 特殊字符 | 转义字符 | 说明 |
|---|---|---|
| > | > | 大于 |
| < | < | 小于 |
| <= | <= | 小于等于 |
| >= | >= | 小于等于 |
| <> | <> | 不等于 |
| & | & | 与 |
| ' | ' | 单引号 |
| " | " | 双引号 |
在 XML 中写 SQL,用到特殊字符的可用转义字符替换。 但使用转义字符比较麻烦,不容易记住,可使用<![CDATA[ ]]>标记里面的内容不被 XML 解析器解析,保留为文本。 <![CDATA[ SELECT * FROM user WHERE age <= 30 AND age >= 18 ]]>
六、模糊查询
mapper.xml 中写模湖查询需要使用 concat 来连接 like concat('%', #{param}, '%') 或者 like '%${param}%' --推荐使用前者,可以避免sql注入。
七、分页查询
WARNING
当返回数据量⼤的时候,⼀定要记得分⻚!
Mybatis分⻚插件PageHelper https://pagehelper.github.io/
- 引入依赖
<dependency>
  <groupId>com.github.pagehelper</groupId>
  <artifactId>pagehelper</artifactId>
  <version>5.3.1</version>
</dependency>- 在MyBatis的核⼼配置⽂件中配置插件
NOTE
核⼼配置⽂件中的标签必须按照固定的顺序: properties?,settings?,typeAliases?,typeHandlers?,objectFactory?,objectWrapperFactory?,re flectorF actory?,plugins?,environments?,databaseIdProvider?,mappers?
<plugins>
  <!--设置分⻚插件-->
  <plugin interceptor="com.github.pagehelper.PageInterceptor"/>
</plugins>- 使⽤
- 在查询功能之前使⽤
PageHelper.startPage(int pageNum, int pageSize);开启分⻚功能
pageNum:当前⻚的⻚码
pageSize:每⻚显示的条数
默认pageNum<=0 时会查询第⼀⻚, pageNum>pages(超过总数时),会查询最后⼀⻚
- 在查询获取list集合之后,使⽤
PageInfo pageInfo = new PageInfo<>(List lists);获取分⻚相关数据
list:分⻚之后的数据
navigatePages:导航分⻚的⻚码数
NOTE
- 接⼝所有的普通参数,尽量都写上@Param参数,尤其是多个参数时,必须写上。
- 参数传⼊能⽤#{}就⽤#{}。
八、自定义映射resultMap
1. resultMap处理字段和属性的映射关系
若字段名和实体类中的属性名不一致,则可以通过resultMap设置自定义映射
<!--
resultMap:设置自定义映射
属性:
id:表示自定义映射的唯一标识(主键)
type:查询的数据要映射的实体类的类型
子标签:
id:设置主键的映射关系
result:设置普通字段的映射关系
association:设置多对一的映射关系
collection:设置一对多的映射关系
属性:
property:设置映射关系中实体类中的属性名
column:设置映射关系中表中的字段名
-->
<resultMap id="userMap" type="User">
  <id property="id" column="id"></id>
  <result property="userName" column="user_name"></result>
  <result property="password" column="password"></result>
  <result property="age" column="age"></result>
  <result property="sex" column="sex"></result>
</resultMap>

<!--List<User> testMohu(@Param("mohu") String mohu);-->
<select id="testMohu" resultMap="userMap">
  <!--select * from t_user where username like '%${mohu}%'-->
  select id,user_name,password,age,sex from t_user where user_name like concat('%',#{mohu},'%')
</select>2. 多对一映射处理
查询员工信息以及员工所对应的部门信息
使用<association>处理映射关系
<resultMap id="empDeptMap" type="Emp">
  <id column="eid" property="eid"></id>
  <result column="ename" property="ename"></result>
  <result column="age" property="age"></result>
  <result column="sex" property="sex"></result>
  <association property="dept" javaType="Dept">
    <id column="did" property="did"></id>
    <result column="dname" property="dname"></result>
  </association>
</resultMap>
<!--Emp getEmpAndDeptByEid(@Param("eid") int eid);-->
<select id="getEmpAndDeptByEid" resultMap="empDeptMap">
  select emp.*,dept.* from t_emp emp left join t_dept dept on emp.did =
dept.did where emp.eid = #{eid}
</select>3. 一对多映射处理
根据部门id查新部门以及部门中的员工信息
使用<collection>处理映射关系
/**
* 根据部门id查新部门以及部门中的员工信息
* @param did
* @return
*/
Dept getDeptEmpByDid(@Param("did") int did);<resultMap id="deptEmpMap" type="Dept">
<id property="did" column="did"></id>
<result property="dname" column="dname"></result>
<!--ofType:设置collection标签所处理的集合属性中存储数据的类型-->
<collection property="emps" ofType="Emp">
<id property="eid" column="eid"></id>
<result property="ename" column="ename"></result>
<result property="age" column="age"></result>
<result property="sex" column="sex"></result>
</collection>
</resultMap>
<!--Dept getDeptEmpByDid(@Param("did") int did);-->
<select id="getDeptEmpByDid" resultMap="deptEmpMap">
select dept.*,emp.* from t_dept dept left join t_emp emp on dept.did =
emp.did where dept.did = #{did}
</select>NOTE
- ⽆论是什么关联关系,如果某⽅持有另⼀⽅的集合(一对多),则使⽤
<collection>标签完成映射。 - 如果某⽅持有另⼀⽅的对象(多对一),则使⽤
<association>标签完成映射。 javaType和ofType都是⽤来指定对象类型的,javaType是⽤来指定pojo中属性的类型,ofType指定的是映射到list集合属性中pojo的类型。
九、sql代码段
可以用<sql>标签来定义可重用的 SQL 代码段,提高代码的重⽤性,简化代码。在需要使用的地方通过<include>标签进行引入。
<sql id="userColumns"> ${alias}.id,${alias}.username,${alias}.password </sql>

<select id="selectUsers" resultType="map">
  select
    <include refid="userColumns"><property name="alias" value="t1"/></include>,
    <include refid="userColumns"><property name="alias" value="t2"/></include>
  from some_table t1
    cross join some_table t2
</select>十、动态SQL
Mybatis框架的动态SQL技术是一种根据特定条件动态拼装SQL语句的功能,它存在的意义是为了解决拼接SQL语句字符串时的痛点问题。
1. if test
- 一般在列表页面,有多个查询条件,并且不确定条件是否使用的时候可以使用
if test语法。<if>标签可通过test属性的表达式进行判断,若表达式的结果为true,则标签中的内容会执行;反之标签中的内容不会执行。
Mapper
//这里需要注意的是,一般持久层中,查询条件多于两个的时候最好创建一PO模型
List<UserInfoVo> findByKeywords(Map<String,String> param)
//如果这里使用了@Param("param")注解的时候,在xml映射中,需要使用param.xxx的方式获取参数mapper.xml
<select id ="findByKeywords" parameterType="java.util.Map" resultType="com.example.test.vo.UserInfoVo">
SELECT * from user where user_type =1
<if test="username != null">
and username like concat('%',#{username},'%)
</if>
<if test="idnumber != null">
and idnumber like concat('%',#{idnumber},'%')
</if>
</select>2. where,set
<where>往往和<if>结合使用
- 若
<where>标签中的if条件都不满足,则<where>标签没有任何功能,即不会添加where关键字- 若
<where>标签中的if条件满足,则<where>标签会自动添加where关键字,并将条件最前方多余的and去掉<where>标签不能去掉条件最后多余的and
<select id="getEmpListByMoreTJ2" resultType="Emp">
  select * from t_emp
  <where>
    <if test="ename != '' and ename != null">
      ename = #{ename}
    </if>
    <if test="age != '' and age != null">
      and age = #{age}
    </if>
    <if test="sex != '' and sex != null">
    and sex = #{sex}
    </if>
  </where>
</select>
- 修改数据用
<set>标签,update user set ... where ...<set>标签会动态地在⾏⾸插⼊set关键字,并会删掉额外的逗号。
<update id="updateUserById" parameterType="com.dto.bo.User">
  update user
    <set>
      <if test="name != null">name = #{name},</if>
      <if test="pwd != null">pwd = #{pwd},</if>
      <if test="age != null">age = #{age},</if>
      <if test="city != null">city = #{city},</if>
    </set>
 where id = #{id}
</update>3. trim
用于去掉或添加标签中的内容
常用属性:
prefix:在<trim>标签中的内容的前面添加某些内容prefixOverrides:在<trim>标签中的内容的前面去掉某些内容suffix:在<trim>标签中的内容的后面添加某些内容suffixOverrides:在<trim>标签中的内容的后面去掉某些内容
<select id="getEmpListByMoreTJ" resultType="Emp">
  select * from t_emp
  <!-- 在前边加where,如果开头是and就去掉 -->
  <trim prefix="where" suffixOverrides="and">
    <if test="ename != '' and ename != null">
      ename = #{ename} and
    </if>
    <if test="age != '' and age != null">
      age = #{age} and
    </if>
    <if test="sex != '' and sex != null">
      sex = #{sex}
    </if>
  </trim>
</select>4. foreach
用于遍历数组和集合
属性:
collection: 设置要循环的数组或集合item: 表示集合或数组中的每一个数据separator: 设置循环体之间的分隔符open: 设置<foreach>标签中的内容的开始符close: 设置<foreach>标签中的内容的结束符
<!--int insertMoreEmp(List<Emp> emps);-->
<insert id="insertMoreEmp">
  insert into t_emp values
  <foreach collection="emps" item="emp" separator=",">
    (null,#{emp.ename},#{emp.age},#{emp.sex},#{emp.email},null)
  </foreach>
</insert>

<!--int deleteMoreByArray(int[] eids);-->
<delete id="deleteMoreByArray">
  delete from t_emp where
  <foreach collection="eids" item="eid" separator="or">
    eid = #{eid}
  </foreach>
</delete>

<!--int deleteMoreByArray(int[] eids);-->
<delete id="deleteMoreByArray">
  delete from t_emp where eid in
  <foreach collection="eids" item="eid"   separator="," open="(" close=")">
    #{eid}
  </foreach>
</delete>批量操作
对于需要⼀次性插⼊⼀批数据的需求,如果在java中使⽤for循环调⽤dao层⼀条⼀条插⼊,那么每处理⼀条数据,就会访问⼀次数据库,跟数据库交互需要时间,造成执⾏效率低。
此时可以选择用
<foreach>,但是更推荐使用批处理⽅式,效率更高。
/**
* foreach 插⼊
* @param list
* @return
*/
int batchInsert(List<UserInfoBatchBO> list);<insert id="batchInsert">
insert into user_info_batch (user_name, pass_word, nick_name)
values
<foreach collection="list" item="item" separator=",">
(#{item.userName}, #{item.passWord}, #{item.nickName})
</foreach>
</insert>批处理⽅式
批处理:累积到⼀定数量,⼀次性提交到数据库,减少与数据库的交互次数。
NOTE
注意:MySql的JDBC连接的url中要加rewriteBatchedStatements参数,且置为true, 并保证5.1.13以上版本的驱动,才能实现⾼性能的批量插⼊。
配置文件mybatis-config.xml:
<dataSource type="POOLED">
<property name="driver" value="com.mysql.cj.jdbc.Driver"/>
<property name="url" value="jdbc:mysql://localhost:3306/mybatis serverTimezone=GMT%2B8&rewriteBatchedStatements=true"/>
<property name="username" value="root"/>
<property name="password" value="123456"/>
</dataSource>Mapper接口:
/** 单条插⼊
* @param info
* @return
*/
int insert(UserInfoBatchBO info);mapper.xml:
<insert id="insert">
  insert into user_info_batch (user_name, pass_word, nick_name)
  values (#{userName}, #{passWord}, #{nickName})
</insert>主函数:
@SpringBootTest
public class UserInfoBatchTest {

    @Autowired
    private SqlSessionFactory sqlSessionFactory; // Spring Boot 自动注入

    @Test
    public void processInsert() {
        List<UserInfoBatchBO> list = datasource(1000); // 1000条数据

        // 打开批处理模式
        try (SqlSession session = sqlSessionFactory.openSession(ExecutorType.BATCH)) {
            UserInfoBatchMapper mapper = session.getMapper(UserInfoBatchMapper.class);

            for (int i = 0, length = list.size(); i < length; i++) {
                mapper.insert(list.get(i));

                // 每 500 条提交一次,防止内存溢出,或者到最后一条数据
                if ((i + 1) % 500 == 0 || i == list.size() - 1) {
                    session.commit();
                    session.clearCache(); // 清理缓存,防止内存溢出
                }
            }
        }
    }
}Mybatis的执⾏流程
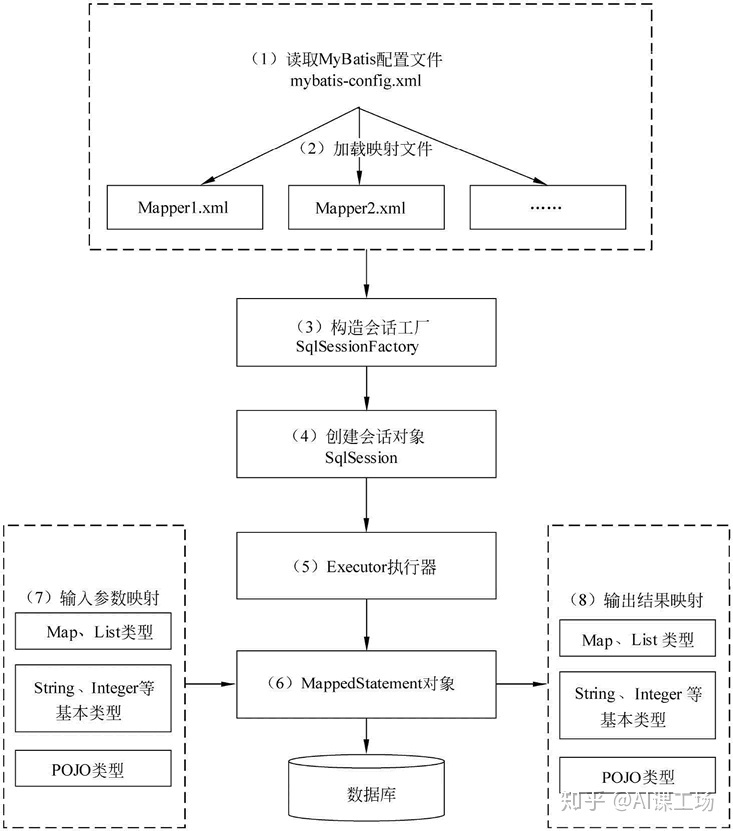
a. 读取 MyBatis 配置⽂件。mybatis-config.xml 为 MyBatis 的全局配置⽂件,配置了MyBatis 的运⾏环境等信息,例如数据库连接信息。
b. 加载映射⽂件。映射⽂件即 SQL 映射⽂件,该⽂件中配置了操作数据库的 SQL 语句,需要在 MyBatis 配置⽂件 mybatis-config.xml 中加载。mybatis-config.xml ⽂件可以加载多个映射⽂件,每个⽂件对应数据库中的⼀张表。
c. 构造会话⼯⼚:通过 MyBatis 的环境等配置信息构建会话⼯⼚ SqlSessionFactory。
d. 创建会话对象:由会话⼯⼚创建 SqlSession 对象,该对象中包含了执⾏ SQL 语句的所有 ⽅法。
e. Executor 执⾏器:MyBatis 底层定义了⼀个 Executor 接⼝来操作数据库,它将根据 SqlSession 传递的参数动态地⽣成需要执⾏的 SQL 语句,同时负责查询缓存的维护。
f. MappedStatement 对象:在 Executor 接⼝的执⾏⽅法中有⼀个 MappedStatement 类 型的参数,该参数是对映射信息的封装,⽤于存储要映射的 SQL 语句的 id、参数等信 息。
g. 输⼊参数映射:输⼊参数类型可以是 Map、List 等集合类型,也可以是基本数据类型和 POJO 类型。输⼊参数映射过程类似于 JDBC 对 preparedStatement 对象设置参数的过 程。
h. 输出结果映射:输出结果类型可以是 Map、 List 等集合类型,也可以是基本数据类型和 POJO 类型。输出结果映射过程类似于 JDBC 对结果集的解析过程。